I got my screen and squeegee from Blick Art. I figure I'm going to mostly if not always use an 8x10 screen, so I got a squeegee to fit that. You can also use a folded up piece of cardboard as a squeegee.
This is the second half of the screenprinting process, printing your shirts. I will have a post later on about making a screen with the medium-tech screen filler method. But for now, let's say you have:
- your shirts to be printed
- a piece of cardboard that fits inside your shirts
- a prepared screen
- screenprinting ink
- a spoon
- a squeegee
- hangers
- an iron
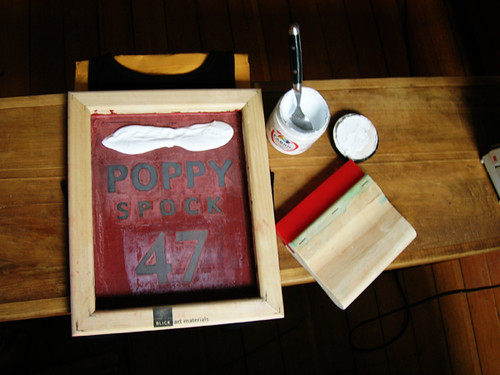
Here I have the screen that I made to print the back of my scrimmage shirts. I'm always thinking about t-shirt designs, but this is by far the most useful screen I've actually made. Unless I'm going to print a lot of the same shirt for, like, my team, I don't ever really want a dozen of the same design, and it's not worth making a screen for just one shirt. But I have to put my name and number on the back of all my scrimmage shirts—well actually, Fury usually scrimmages in white. I guess I could just use a sharpie. But like I said I sometimes have to play black, and white's the only color that sharpie shows up really well on. So also if you scrimmage in blue or red. Anyway, I've used this screen quite a bit.
First, lay your shirt on a flat surface to be printed. Put the cardboard inside the shirt to keep the ink from bleeding through.
Position the screen where you want it on your shirt.
Scoop a spoonful of ink on the screen, and pull it across the top of the screen. The amount shown in the picture was maybe a little too much: too little ink and it will print too lightly, too much ink and it will print too thick.
Drag the ink down the screen with the squeegee, making sure to press the ink all across your design. A few passes in all directions usually does the trick.
Carefully lift the screen off the shirt. Put the screen down on some newspaper. If you're printing multiple shirts, be careful about smudging the ink on the backside of the screen because that will smudge your other shirts.
Put the shirt on a hanger, and then pull out the cardboard. Hang the shirt up to dry. It will be dry to the touch reasonably quickly, if you didn't use too much ink. I usually let it hang for 24 hours to fully dry before the last step.
As soon as you're done printing, thoroughly wash your screen and your tools. If the ink dries, it will be stuck for good. If it dries on your screen, you won't be using that again. I scrape as much of the ink as I can back into the jar to be reused, then rinse everything pretty much clean with a lot of water. Then I wash it all with dish soap and a sponge.
Finally, using a pillowcase as a scorch cloth, iron the shirts at the highest setting recommended for that fabric for about three minutes. This sets the ink so it will hold up for repeated washings.